

🌟 Unleash Your Inner Curl Queen with Comfort and Style!
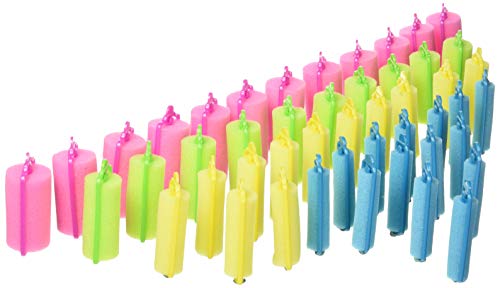
The CONAIR Foam Hair Rollers come in a set of 48 assorted colors, designed for heatless curls that can be worn overnight. With a built-in quick clip for easy styling, these rollers cater to all hair types and textures, allowing for versatile wet or dry sets while preventing hair breakage.


H**7
LOVE THESE FOAM ROLLERS
CONAIR FOAM ROLLERS -- 48 COUNTOMG! I used this type of roller waaaaaaaay back in the 1960's and 1970's and loved them back then. I grew my hair out after having it short for over 30 years and decided to get some foam rollers for when I want to change up the style. We always called them curlers though.......This is a nice variety of 48 rollers. They come in four different sizes and are four different colors. The pink are the largest, the lime green next, yellow is smaller, and the blues are teeny tiny for shorter hair. There is a nice variety of each size. They come in a handy and sturdy zippered and see-through container for easy storage. And they look so pretty.These curlers are comfortable to sleep on. I use the smallest curlers on my shorter hair and where I want a tight and defined curl. Larger curlers are for volume, body, and waves. I have layered hair that almost reaches my shoulders. I mainly use the curlers on the tops and sides of my hair where I want some curls and waves. I like a hot mess look. My hair seems to do what it wants to do anyway and these curlers helps make it look really cute.Sometimes I put the rollers in while my hair is wet and then sleep on it. Other times I dry my hair a little bit, add some curlers and let it dry. Still other times I curl my hair when it is dry. I just add random curlers here and there, spray it with hair spray, leave them in and see what happens! The curls lasts a decent amount of time. I am sure the curls last differently for each person's type of hair. My hair happens to be thin and fine and after a while it goes a little flat. But that's OK -- the curlers seem to define my style and add to the overall good looks.These click right into place quickly, efficiently, and stay right where you place them. They also look pretty in your hair while you are using them. My grand babies love it when they come over and my hair is a rainbow of curler colors! Like I said, every time I use these curlers I use them differently! I have no rhyme or reason.I was glad that these foam rollers are still being made and made very well. The plastic is sturdy and I have never had a problem with the roller moving along the plastic band. They are easy to use. They are comfortable to sleep in. You are in control of the rollers!This is a great product that has been around forever. They work, they last, and they make your hair look great!Highly recommended!!!!
S**A
Best sponge rollers for great hair styles🦋
Excellent product. Conair wins out all the time. These assorted sponge rollers are great for various hair styles and types. They are super strong and durable. The snap stays closed too. Pretty colors: Hot pink, blue, light pink and orange. Different sizes to meet your needs. Great price and I think I did good ( my niece loves , loves loves them😃🩷
Q**E
Works beautifully with African American long hair for basic and intricate vintage dry sets!
I like these curlers for doing more intricate vintage hairstyles with an overnight dry set.For a basic vintage dry set I prefer using a set of foam and wire silky cloth rollers that I also bought on Amazon.I bought these originally from Amazon but they came damaged so I purchased the same set elsewhere for more money because shipping was not included.🤷🏽♀️Oh well 😔 Lets get on to the review shall we?I have long very thick hair and bangs plus I don’t use heat on my hair, but I love to rock vintage hairstyles.Since it’s kinda hard to get the right kind of vintage curl if you don’t use heat and have long hair especially if you have African American hair and want your edges to be smooth *** I have 3c edges and the rest is 2b/c ***, I’m gonna give you an example of how I use these to create vintage styles like the one in the picture.There are a ton of ways to do this style, this is just how I have to do it for my hair type.🤓As I primarily sleep in my curlers, I usually only do the front with these particular curlers because sleeping in regular foam rollers is uncomfortable.I prefer to use the foam and wire rollers for the back because they are like sleeping on mini pillows. These foam ones were absolute murder in the back to sleep in for me and I’ve been sleeping in rollers, even the hard plastic variety!!!!!, for 20 years.If I am doing a day set and not sleeping in them, I use the entire color variety of curlers which is what I did for the hair in the picture.How I used these:I begin with my normal side part.Then I part my hair with a rat tail comb starting from the tip of one ear over to the tip of the other ear.I clip the rest with a claw clip so it’s out of the way.I take the less hair heavy section and clip it so it’s out of the way as well, then I take the heavier hair section and start to part it.I slightly dampen the parted sections with a curl cream, then starting from the top of my head, I take the first section of hair from the middle of the section and place it on top of the open blue curler.Then I place a finger on top of the hair that’s directly on the roller ***to keep it steady and the curl smooth ***and use my other hand to wrap the bottom part of my hair around the curler in an over under motion to the end.You can generally remove your finger once you have wrapped it the first time.It usually takes about 6-8 winds around the curler to get the bottom part of my curl all wrapped up.I then grip both ends of the curler so that the hair stays on and is smooth and continue to roll the hair up to my scalp making sure to pull taught so all my crinkly edges get in there, taking care to ensure the curl tip is smooth and tucked into the roller when finished, then snap the curl bar down.The first curl is rolled with the hair over the curler from the middle in an over under motion and the next with the hair wrapped in an under over motion till you reach the scalp.Continue rolling the curls like this until you reach the end.It’s important to figure out how many pieces to section off so that the last curler is rolled in an under over motion towards your scalp.I had 4 sections, but if I want it to be even more elaborate, I have 6.Repeat on the other side.For the remaining hair in the back, I part it down the middle and roll each separate side from the top down. I do it this way because it’s easier to sleep in them for me and it’s become a habit even when I’m not sleeping in em, but you can section your hair all the way across your head in the more traditional manner if you prefer.I clip off one side with the claw clip and start sectioning the other side of my hair from the top.I use the large pink ones for the top 2 rows for volume ***rolled with the hair over***, the green for the following 2 rows and the yellow for the last 1-3 rows *** all but the first two rows are rolled with the hair in an under over motion around the roller till you reach your scalp***Repeat on the other side.My hair doesn’t like to hold a curl at the bottom but using the second to smallest roller in this set helps alleviate the problem.I cover my hair with either a head scarf or silk bonnet to keep the curls smooth and use a steam cap for 20-30 mins to set the curls if I’m doing a dry set.I also cover my hair when sleeping in the set to prevent breakage and to keep the curls smooth.If doing a dry set and not sleeping in the rollers,because I have a massive amounts of hair, it can take 4-6 hours for the hair to set.The steam cap is CRUCIAL to making sure the curls hold and your edges are steamed so they are smooth.I don’t want to tease you with partial knowledge, so since I described how to use the rollers to get the hair in the picture, I might as well finish you off and tell you how I created my curled results.🤓I take the back out first, finger comb the curls then twist one side into a tight high bun and repeat on the other side. If you want less volume, make the buns low.The buns have to be tight at the crown so that your edges are smooth when you take off your steam cap.Put on a steam cap for 10-20 mins and leave your hair in the buns after taking off the cap.Then take out the front. I take out the heavier side of my hair first, style it, then do the other side so I can blend them together easily and I don’t have a mass of hair to deal with all at once.I don’t comb the curls, I wind each curl around my finger and pin all the individual curls from the back so the pins don’t show, to my head with the little curled “o” facing forward. Do this for all the curls except the last curl at the bottom***the one you curled towards your head*** .I tease the last curl bottom starting at the base of my scalp up to about half the hair length, then I smooth the outside with the teasing brush, curl the curl around my finger towards my head and pin the curl up and behind the curl mass I previously created, with the curl o facing front.You may need to randomly put some more pins in the curl mass to secure it.I don’t have to use a smoothing cream for any flyaways or hairspray to set everything any longer due to my new hair care regime, but don’t be afraid to use either if the hair isn’t looking as polished as you’d like it to and to make sure the curls don’t fall.I love this hair style because I can put the back in ponytails when it’s hot, wear it with the back down and free flowing or put the back up in a chignon to make it extra fancy.🥳The other cool thing about this style is if you wear a silk bonnet to bed and twist up the back in a bun to sleep, you can keep the style fresh and looking fabulous for up to 4 days!These curlers give the best set for this type of style because the curl lasts for days.🥰I think this is a great set for the price and I’m super glad I bought them, I just wish the ones that had come from Amazon were not damaged.🤷🏽♀️
Trustpilot
1 month ago
2 weeks ago