🚽 Flush Away the Noise with Style!
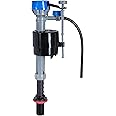
The Fluidmaster 400H-002 Performax Universal Toilet Fill Valve is designed for high performance and ease of installation. This fill valve is compatible with most toilet models, features customizable water level adjustments, and operates quietly to enhance your bathroom experience. With a 7-year warranty, it's a reliable choice for both professional and DIY installations.


| Material | Plastic, Rubber |
| Brand | Fluidmaster |
| Item dimensions L x W x H | 3.35 x 4.33 x 13.19 inches |
| Inlet Connection Size | 0.75 Inches |
| Inlet Connection Type | Fill |
| Outlet Connection Type | Compression |
| Number of Ports | 2 |
| Outlet Connection Size | 0.75 Inches |
| Specification Met | code approved, anti-siphon design and water saving bowl water level adjustment |
| Valve Type | Toilet Fill Valve |
| Manufacturer | Fluidmaster |
| UPC | 300716763504 039961025913 300719040572 |
| Part Number | 400H-002-P10 |
| Item Weight | 9.6 ounces |
| Product Dimensions | 3.35 x 4.33 x 13.19 inches |
| Country of Origin | USA |
| Item model number | 400H-002-P10 |
| Size | 1- Pack |
| Color | Multicolor |
| Style | 1-Pack |
| Pattern | Control |
| Shape | Shape |
| Item Package Quantity | 1 |
| Usage | Professional |
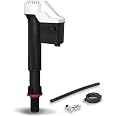
| Included Components | Toilet Fill Valve and Parts |
| Batteries Included? | No |
| Batteries Required? | No |
| Warranty Description | 7 year manufacturer |
L**E
was perfect to replace American Standard 400 model anti-siphon
Wow. I had no idea how toilets worked to any real level of detail. I just knew mine wasn't shutting off at the end of the fill.I had a "400 model anti-siphon" Fluidmaster that came with the American Standard toilet. I was able to replace the main part only, leaving the part that attaches to the water supply from the wall where it was. That is the hard part of replacing this thing if you replace all of it, and it involves a bucket and the towels and all that. Plus a tool or two I didn't have. Turns out you can just leave that bottom black part in place (assuming it doesn't need replacing because of a malfunction in that part), move the white plastic part that goes up and down - it's the white thing in the drawing that is on the grey part that is on the black thing. The white piece can be pulled up and then the grey part and everything with it comes off and the new one can go on in the same place.The problem for me was that the white thing in the one in the toilet wouldn't move at first and it is a very awkward angle to try to do much with it. Having practiced with the entire new one, that white cylindrical piece moves easily, but that wasn't the case with the one that had been under water for a long time. I moved it around on its axis a little with some pliers, tried to grab it with a towel. Ten minutes of frustration and very awkward angles, some lost skin - it was annoying - and finally I got it to come up and the whole original one came off. Ten seconds to replace the whole thing after that. You'll have to get the height right but there are at least two ways to adjust that.Then I notice it's taking a long time to fill. Oddly, noticeably long. Over two minutes, which was pretty long given my recollection of the original one. Spent quite a while with AI asking questions. When I directed the refill right into the tank then it only took half the time. More time with AI and now I understand. Anyone who knows about this - plumbers, people who know how things like this work, won't need my comments, but I had no idea how all of this actually works. Now I do. It turns out that the refilling tube that goes into the overflow tube, which is the thing the water starts gurgling into when the valve isn't turning off - that is to refill the bowl, not the tank. The tank is filled at the bottom of the item we're discussing, which is the whole shut-off valve assembly in the picture where it's for sale here. So turns out that even though the bowl is virtually filled all at once at the end of the flush when the vortex thing stops and you let go of the handle, it still needs a little bit coming in to make sure it's always at the optimal level for each flush, but hardly any. And if more comes in, it just quietly goes out into the sewer system, that is, out of the toilet completely and off into whatever the flushed stuff goes into.So in my initial setup, I had the fill tube set to maximum thinking I was going to fill the tank faster that way. But since that tube was going directly into the overflow valve, which it is supposed to, at the top setting, which is adjustable on this thing in a very obvious way, a large portion of the refilling water was just quickly flowing out into the sewer system. And that's why it was taking so long to fill even though the water comes out fairly powerfully from the refill tube. It's just that with the refill tube stuck into the overflow tube, a lot of that powerful flow was going into the bowl and quietly out of the building.Again, the refill tube isn't the only place the tank fills from. And the refill tube does need to go into the overflow valve to make sure the bowl is filled to its optimal level, which is predetermined by the physical size and shape of the "trap", which is an s-shaped structure that keeps the water in the bowl but then lets all that out at the moment that the flush action releases most of the water in the tank into the bowl, which is then enough to overcome the weight of the water in the trap and send everything down into the plumbing and out into the sewer. The trap is what keeps the water in the bowl and it's also constructed in a way that allows all the water to go out when its level of inertial seal is overcome.I wouldn't have been able to get any of this right if I didn't understand all of that, which is why I'm explaining it. Aside from the frustration and lost skin, the actual replacement with this thing, once you get that white thing to move up, is like a thirty second process. But since the volume of flow of the refill tube is adjustable, you have to understand how all that works to know how hard to make that setting/flow. Although now that I know, the answer is that if your bowl is filling quickly and easily and properly right at the end of the flush like it should, you can turn that flow on the refill tube to as low as it goes and some water still comes out - and that should be more than enough. You'll notice the adjustment mechanism for that flow at the base of the refill tube where it comes off of the shut-off valve, which is the entire thing we're discussing that I just bought here.Now the refilling of the tank to be ready for the next flush is around 1:08 instead of 2:05. 2:05 felt very, very long. 1:08 feels closer to normal.
P**S
Don't call a plumber, fix this yourself!
I have now replaced this on 3 toilets, and this kit has been great. Let me start by saying that I am not super handy, but I can do SIMPLE tasks. The first time I did this, it took me 30-45 minutes because I wasn't familiar with anything -- the next 2 times took about 15 each. The hardest part is draining the residual water from the tank! I had to mess around with the length of device a little bit but it wasn't too hard. The first time I installed it, I didn't get a good seal to the bottom of the tank so I had a *small* leak so I had to start over, but that was user error on my part.I did have 1 issue after I installed the first one, and it was that the tank kept periodically filling (like there was a slow loss of water into the bowl) -- after a Google search, I discovered that I had set the filling hose too far down into the pipe -- not sure why but this was the cause of the problem. I fixed the problem and haven't had an issue since. Highly recommend you try doing this yourself, especially if you have a 2nd toilet you can use in case you really can't figure it out and have to call a plumber. Even if you start and fail, at least you'll have the part for the plumber to use! Just make sure the bolt is tight at the bottom of the tank so it doesn't leak!
A**A
Great replacement valve, easy install, affordable cost.
This is a very user friendly replacement fill valve.No tools are required to install it, the locknut is designed to be tighten up by hand. The gasket seals nicely so no leaks whatsoever.Probably you will spend more time removing the old valve than installing the new one.The water level at the tank and the bowl are already preset to maximize water saving so you won't have to worry about it. However, if you wish to rise or reduce the water level on either one, it's very simple to do it by turning the preinstalled adjustment screws.The height of the valve comes also preset but you can also adjust it by following the simple instructions in the Quick Install Guide, which comes with color illustrations to make it easier to follow.Last but not least, the cost of this fill valve makes it extremely affordable.Great product, I have already installed in two toilets and I'm very happy with the results.
S**S
Loud but highly adjustable
This universal refill replaces many different coloured caps of Kohler and other brands. I like how you just turn a dial to adjust how high the tank fills and another dial to adjust the height of water in your toilet bowl after each flush. It is noticeably louder than the yellow cap Kohler refill that it replaced but it fills the tank faster. Overall, I'd buy it again.
D**N
All Inclusive Repair Kit
You get a complete kit of TWO fluidmasters with instructions in a nice storage box. Easier to install than the old ballcock flush valves and waaaay easier to repair in the future. Durable? I typically get 10 years of daily use for these and it's a ten minute repair job when they eventually wear out. Clever design and made from recyclable plastic as well. You will need a working shut-off valve, a utility knife, maybe a pair of pliers, and some handyman spirit. Their instructions are full-sized, complete, and easy to understand.
J**J
Excellent
The instructions are excellent and leave nothing out. The hardest part of this project is removing and replacing the water supply line from the water ON/OFF to the tube at the bottom of the tank. Mine had a custom size metal tube fit by the plumbers. I removed and replaced it with a 12" stainless steel braided one. Working on this project may cause the flapper valve to leak because you've disturbed an old seal. This WILL cause the tank to intermittently fill, which will be annoying. I replaced mine which fixed the problem.
A**L
The go to brand for toilet flow.
Fluidmaster makes a good product. Instructions are easy to follow and it’s a one person job. My only problem was unsticking the water cutoff valve, the solution of which was found on YouTube! This job will cost about $250 if you call a plumber, versus the price of the Fluidmaster and an hour of your time.
Trustpilot
5 days ago
4 days ago