Cook Like a Pro, Anytime, Anywhere! 🍽️
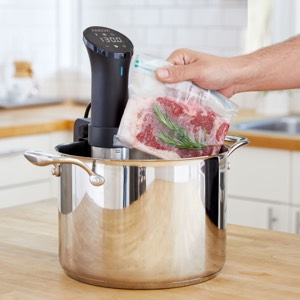
The Anova Culinary Sous Vide Precision Cooker 2.0 is a powerful 1000-watt device that ensures perfectly cooked meals every time, thanks to its precise temperature control and app connectivity. With a temperature range from 32°F to 197°F, it accommodates a variety of foods, while the Anova app provides access to thousands of recipes and cooking guides, making it ideal for both novice and experienced cooks.


| Control Method | App |
| Upper Temperature Rating | 197 Degrees Fahrenheit |
| Lower Temperature Rating | 32 Degrees Fahrenheit |
| Voltage | 1.1E+2 Volts |
| Wattage | 1.1E+3 |
| Capacity | 8 Liters |
| Item Weight | 1.98 Pounds |
| Item Dimensions D x W x H | 3.07"D x 3.07"W x 12.8"H |
| Color | Black and Silver |
| Material Type | Stainless Steel, Plastic |
A**R
Extremely pleased (full details and tips to save you time / disappointment)
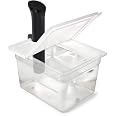
My first attempt using this machine was an expensive steak, which came out perfectly after a pleasantly easy cooking experience. I made this purchase knowing exactly what I wanted to achieve and only after having scoured the internet for reviews and tips. The research paid off and I’m going to share it.This unit was always in the top five of any review site I found; it was often in the top two. My reasons for selecting the Anova from the list of well-reviewed devices were:1) Ease of use: six simple buttons and a large display that my older eyes appreciate are neatly organized unto a control panel on top of the unit that is slanted for easy access.2) Power: I felt that 1000 watts was a nice compromise. It’s important that the unit be capable of preheating in a reasonable time and maintain a constant temperature in a larger vessel (if I want to use one). I didn’t believe that my needs (8 or less people) justified the additional expense of a more powerful unit.3) Comments from somebody who purchased the competing, well-reviewed unit and emphatically lamented the lack of any controls at all on the device itself (i.e. that device relies on a mobile phone app for control and monitoring). As this reviewer pointed out: these units are simple water heaters; that’s all they do. There is absolutely no reason to overcomplicate, glorify or cutsey-fy that simple fact. You will do well to consider that during your evaluation. The Anova also provides an app but one has the option to use it or not. I have not yet attempted to do so, so I cannot speak for ease of connecting this unit to wifi.4) Price: attractive considering the features, relative to the competition.Anybody who is considering sous vide needs to carefully consider what it is and what it is not.• First off, if you like your meat rare, well-done or charred, don’t waste your money. Lovers of medium-well should also consider carefully. Rare is much easier to accomplish on a grill or skillet (i.e. flash sear on each side and done). Likewise well-done or charred. Medium-well that is truly medium-well can be a bit tricky to achieve consistently and may therefore warrant this device but, in my opinion, it negates most of the benefits (e.g. tender and juicy).• It works best on small to medium-sized meats or fish. You get foods that are perfectly cooked from edge to edge and crackling with flavor every time, because they are slow cooked at a constant temperature inside a vacuum-packed bag that seals in all of the goodness. Assuming that you start off with good cuts of meat, you will end up with flavor, tenderness and juiciness that will blow you away.• You can get a really nice but relatively thin crust on steaks and crispy skin on fish/poultry by finishing with a pan sear. Tips will be shared below.• You cannot get the intense BBQ flavor or thick crusting of grilling but you can get a thinner crusting and some of that BBQ flavor by searing with a grill or blowtorch. Sous vide is probably not for you if you like your steak infused with the smokiness of a grill; you may find this method to be too bland for your liking.• You’re likely to never use this device if you are always in a hurry at mealtime. Sous vide takes time, which is the secret of its tender and flavorful results. The included app and wifi capabilities of this device may be useful to those who lack the necessary time. Set everything up before you leave home and, later in the day, use the app to activate the unit (i.e. such that the food is cooked when you get home).• Sous vide is not suitable for most vegetables. You can make it work for some, notably carrots and corn on the cob, but not for most. It's also not for large chunks of meat (e.g. roasts, hams or whole birds), which I believe do far better in an oven. There are some who claim that they have successfully cooked a roast sous vide but I prefer an oven at 250 to 275 with a good meat thermometer. Tri-tip is an exception to this rule; it does quite well with sous vide.• Everybody at the meal must like their meat cooked to the same level of doneness. I suppose that you could accommodate a guest who wants rare (i.e. briefly seared on each side) or well done (i.e. cooked to death) but anything in between would be better handled with sous vide and, unless you have more than one machine, everybody must like their meat the same way.My experiences:• I am a foodie who enjoys cooking. I want to enjoy the results of my cooking and I am willing to pay for good quality food. I like my meat medium rare to medium. I like a good crust on a steak and crispy skin on poultry or fish fillets. I got tired of the mediocre meats that I was able to purchase at the supermarket. I now patronize butchers and fishmongers, who sell high quality goods at a much higher price.• At these price points, I want to do everything in my power to maximize flavor and minimize the risk (i.e. of me screwing something up). Grilling is fun, sauté and/or baking is fine but the results are all-too-often inconsistent, especially for thick steaks and some poultry (e.g. duck): it's far too easy to get perfectly-cooked flesh and wimpy skin or crispy skin and dead flesh.• Hence my interest in sous vide. Cheap was not an objective. If I’m going to do it at all, I’m going to do it right. So, I also purchased the Anova 12L cooking container and vacuum sealer. The vacuum sealer is unnecessary if you are adept at using Ziploc bags and the displacement method of creating a vacuum; I am not, so vacuum sealer for me. The cooking container is not cheap but there are several reasons that I am happy I bought it: 1) its large but not enormous size fits perfectly inside my sink; 2) the included rack enables me to hang eight bags without impeding water circulation; 3) the cover minimizes evaporation; 4) I can see through the transparent walls from any angle and ensure that none of the bags have sunk, or have sprung a leak (especially important when cooking at higher temperatures).• Everything came well packaged and nothing was damaged. Unpacking was easy (i.e. no chainsaw required) and setup was a breeze. I am very pleased by the high quality of everything. The instructions for the sous vide unit are adequate. I did have to play around a bit with the clip, until I got the hang of it, but everything else was clear enough, even for a klutz like me. I found the controls to be very easy to use and the display is very easy to read. Temperature wavered by 0.1 or 0.2 degrees until preheating was complete but thereafter it was rock solid, possibly because I am using a covered container inside the sink, which provides some degree of insulation. It makes a noticeable hum while operating, which did not annoy me but it probably could annoy some. When the timer expires, it makes a couple of noticeable beeps. The vacuum sealer was more challenging; I had to watch some tutorials – I did mention that I’m a klutz – but this is not a review for that unit.• Most importantly, I got highly-satisfying results from the onset. I am delighted with this purchase. As long as your expectations are in alignment with the capabilities and limitations of sous vide, I am confident that you will also be delighted with this unit.Tips:1) Do some research! I especially appreciate tips and recipes provided by Food Lab’s J. Kenji Lopez-Alt at the SeriousEats site and Helen Rennie’s tutorials at YouTube.2) Read the instructions and follow them. The two individuals I named above will tell you everything you need to know about temperatures and timings for myriad types of food and doneness.3) Temperature is critical; always cook at the temperature advised to achieve the level of doneness that you prefer, no matter how big your pot is or what it's made of or how many bags are inside it. Don’t worry too much about letting things cook longer than the recipe calls for. Most meats are very forgiving; up to an hour longer than recommended won’t make a noticeable difference. Fish and seafood are much less forgiving; up to about 15 minutes longer than recommended is maximum. Eggs are even less forgiving of overtime (i.e. if you want your yolks less than hard).4) I have two sinks, so I put the container into a sink and fill it with hot water right out of the tap. Cooking occurs in the sink, covered. I believe that the cover and confined space of the sink enhance heat retention. After I’m done, water is simply dumped into the sink.5) Don’t forget to add your favorite aromatics to into your bags. Do NOT add fat of any kind to meats except fish or seafood (see below).6) I prepare steak with a generous sprinkling of sea or Himalayan salt on both sides and letting it sit for about 30 minutes before adding the aromatics and sealing the bag.7) To cook more than one piece of fish in the same bag, it’s advisable to add some oil to the bag to prevent sticking. Vacuum sealers and liquids do not get along, so: a) use a Ziploc bag and water displacement; b) brush the fish with a light film of oil; c) place thin pats of butter inside the bag.8) A pound of raw, peeled and deveined shrimp should be tossed in 1/3 tsp baking soda (NOT powder) for about 30 minutes before cooking to enhance texture. I like to cook it together with butter, tarragon and several cloves of crushed garlic for about 30 minutes at 132 degrees.9) The biggest trick to sous vide is the searing process after the cooking is done. There are a million different opinions about how to best sear. You will find some great advice at the websites mentioned above, so I’m going to focus on what I like. I do not much care for the bitterness added to the flavor by placing non-clarified butter in the pan and/or using a blowtorch. I do, however, like a dark brown crust on my steaks and crispy skin on my duck / salmon. Searing immediately after removal from the bag did not achieve optimal results, no matter how much paper towel I applied. There is too much moisture bleeding and too little time to achieve the crust I sought without adversely affecting the perfect doneness. So, here’s what I do.9a. Meat is removed from the bag and triple wrapped in paper towel. Steak is placed in refrigerator for 10 minutes, rewrapped in new paper towel and put back in the refrigerator for 5 minutes longer. Duck is also wrapped but left in the refrigerator longer, until it has completely cooled, which enables a longer sear.9b. After removing the meat from the refrigerator and unwrapping it, I preheat my aluminum pan to medium high heat. I prefer aluminum because it preheats more evenly and reacts more quickly to heat changes than cast iron does (e.g. when my stovetop is too hot and I need to turn down the heat pronto). I use ghee in my pan because I like the rich flavor that it adds but any oil with a high smoke point will work too. Since ghee has moisture and milk fats removed, it doesn’t burn as butter does.9c. The pan is ready when ghee just starts to smoke (at about 450 degrees). Oils with higher smoke points will be shimmering but not smoking. Immediately add the meat (i.e. don’t permit the fat to smoke more than seconds). For duck: place it skin side down for about 7 minutes, jiggling and pressing it with a spatula every once in a while. Start peeking for doneness after about 3 minutes and every 30 seconds thereafter, permitting the skin to get as brown as you like (up to 10 minutes). Finally, flip the piece and cook it for 30 seconds more. For other meats: sear on one side for a minute, flip, and cook for a minute more. If the upside is not crusty enough, flip again and continue to flip every 30 seconds until both sides are satisfyingly crusty. It’s a myth that you ruin the crust by flipping. For all meats, you may want to pour the cooking juices over the meat (not the skin) to add flavor and warmth.
T**Z
This product is perfect in every way
I do all the cooking for the family, and I cook a large variety of meals, except steaks. For some reason, I could never cook any steak so that it ends up juicy, and tender. I default to the well-known quote, “a man has to know his limitations.” For me, steak dinners required a trip to the local steak house; and even they were seldom consistent with their steaks, but always pricey.Then I discovered sous vide. I now have steaks at home once or twice a week, and always perfect; never tough or dry, and always done exactly medium.This Anova unit is great. It is simple to set up and adjust the settings. The primary function of this product is to maintain a constant water temperature for hours at a time, and it does it perfectly. I do not use the smartphone app, because it is so simple to set up, and monitor as is.To date I have cooked, NY strip, ribeye, T-bone/porterhouse, chuck pot roast (24 hour cook time), pork chops, chicken, and cod fish. Another plus aspect of sous vide is that with the high prices of steak, you have no fear of making a mistake when cooking your steak. In addition, I only buy choice cuts. There is no need to pay extra for prime cuts when you use sous vide.My recommendations for accessories: Buy a plastic container with lid, I use the EVERIE Sous Vide Container 12 Quart. I also bought the EVERIE Weighted Sous Vide Rack Divider, very handy. Many people mention that you do not require a vacuum sealer for sous vide, but I highly recommend it.Personal thoughts on my new sous vide experience. I have taken the same cuts of meat or fish, prepped and separated them into two sealed bags, froze one bag and cooked the other fresh. I saw/tasted no difference between the two; another convenient plus. I like to add one hour cook time on frozen meat, 10 minutes on fish. Note, all my steaks are 1 ½ to 2 inches thick.I found for my tastes, 140 degrees is perfect for all my steaks and pork chops. Times vary from 4 to 6 hours. For cod fish, 135 degrees for 40 minutes. Of course everyone will find their perfect preference.As expected, YouTube has excessive sous vide videos. I found the most useful overall information from the series called “Sous Vide Everything.”After cooking your meat, you will want to sear it. This is my method: I use a simple skillet, and high smoke point oil, above 480 degrees. Therefore, your choices are clarified butter or avocado oil. I heat just to smoke point, place the meat in the skillet, cover with a heavy metal bacon press, and sear for only 30 seconds on each side.To anyone who likes a thick cod fillet, the sous vide method excels, perfect every time. Of course you can add your favorite fresh spices into the bag, and or lemon slices. I may or may not sear the cod depending on the meal. My latest attempt, I covered the cooked cod with sautéed leeks and crème fraiche.I highly recommend this product to all those who enjoy cooking.
L**A
Working Great for Four Years Now
I've had this sous-vide device for nearly four years now. It works well. The app has continued to function / be maintained. Tenderizing / cooking meat is easy, albeit you should own a vacuum sealer as well.
D**N
great
works good
Trustpilot
1 month ago
2 months ago