Desert Online General Trading LLC
Dubai, United Arab Emirates
Desert Online General Trading LLC
Dubai, United Arab Emirates

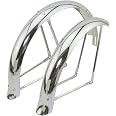
🚲 Ride sharp, stay dry, and turn heads with Alta’s flared fender flair!
The AltaBicycle 20" Flared Adjustable Fender Set offers a complete, stylish solution for bike protection with front and rear fenders, adjustable braces, and hardware. Designed to fit all fork types—including bent spring forks—this lightweight, chrome-finished plastic set combines vintage flared aesthetics with modern durability, making it a must-have upgrade for any cycling enthusiast.
| Brand | Alta |
| Color | Chrome |
| Exterior Finish | Chrome |
| Material | Plastic |
| Style | Modern |
| Auto Part Position | Front |
| Vehicle Service Type | Bicycle |
| Fit Type | Vehicle Specific Fit |
| Manufacturer | F & R Cycle Inc |
| UPC | 810012133241 |
| Item Package Dimensions L x W x H | 24.31 x 13.59 x 4.81 inches |
| Package Weight | 1.06 Kilograms |
| Brand Name | Alta |
| Part Number | 149214-149226 |
G**L
Fits my 20" EuroMini folding bike pretty much perfectly
No instructions. I didn't understand, at first, that these don't attach to stay points, they go right over the axles. (You have to take the nut all the way off and then put it back on after you slip the stays over the axles.) Front fender has nowhere to attach the included mounting bracket, so I had to mark and drill my own hole. There's only enough nuts and bolts for 1 attachment point on the front and rear mounting points. The short fat popsicle stick looking thing is for attaching the rear fender to the bike, around where the kickstand is. Attach the popsicle stick to your bike, then attach the fender to that, then attach your stays to the fender. Same for the front. Attach the mounting bracket to the bike around where your front reflector is, attach the bottom fender stay and make sure it is parallel to the ground (the fender will be long in back, short in front). Mark on the front fender where the hole is on the mounting bracket. Drill that hole and use the tiniest nut, washer and bolt to attach the fender to the mount on the bike. (The twin to that tiny nut, washer and bolt is used to attach the rear fender to the short popsicle stick mount.) After you have the fenders attached, put your wheels back on, slip the stays over the axles, put on your washer and nut, and screw it all down. When it's properly tightened is will be straight and your tire will spin freely. Mine did not until it was tightened down properly, then I just kinda tugged the fender a little and it was good to go. Other than having to drill and figure all this out on my own, I'd say these fenders are a fantastic deal and are of very nice quality. Oh and I think the rear fender is SUPPOSED to have that weird bend in it. It looks intentional and I think it's to make it for through different types of frames better. I dunno. I hope this helps?
E**E
Love it low
Looks good
F**
Classic fenders
Only fits the rear wheel, won't fit the front fender rear bracket
E**R
Black fenders
Good fit love the shop will order more from them
M**O
Fenders were great but the hardware
fenders were in great condition but the hardware I'm missing FU and don't understand where the long one with the lock washer goes
K**A
Bent fender
I ordered 3 parts. The frame and handle bars were great but the one of the fenders had a dent in it. I think its more of a shipping problem than F&R cycle. Everything else was good. I will continue to do business with them.
A**S
50% works
The rear does not fit no matter what I do I’ve even cut it to try to make it fit. It will not fit no matter what. But the front fits perfect the front is beautiful I just wish the back would match.
M**.
Look sharp
Had a bit of an indentation, pulled back into shape and they worked fine.
Trustpilot
4 days ago
1 day ago