


🚗 Drive Smart, Stay Safe!
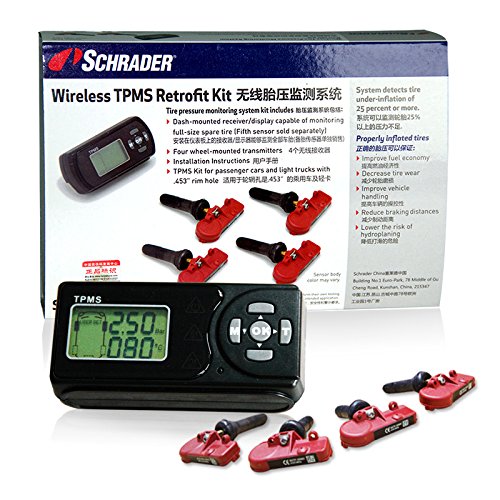
The Schrader SCH-BRK-4PC TPMS Retrofit Kit is a comprehensive solution for tire pressure monitoring, featuring four rubber valve sensors and a user-friendly LCD display. Designed for easy installation on most vehicles, this kit enhances safety by continuously monitoring tire conditions and alerting drivers to any issues, ultimately improving fuel efficiency and reducing the risk of hydroplaning.
| Manufacturer | Schrader |
| Brand | Schrader |
| Item Weight | 15.2 ounces |
| Product Dimensions | 8.7 x 6 x 2 inches |
| Item model number | SCH-BRK-4PC |
| Manufacturer Part Number | SCH-BRK-4PC |
I**O
Great TPMS retrofit kit
This kit -- which is hard to find recently -- is excellent. Schrader makes OE TPMS sensors for many car manufacturers so I feel better using these than any other brand. And I called Schrader to confirm that you can replace the rubber valve stems with the aluminum Schrader valve stems (Schrader 34000 Aluminum Clamp-in Style Valve for TPMS Snap-in Sensor). You have to have a valve stem core torquing tool (you can buy the Schrader one on Amazon for relatively cheap) to install the core in the stem but otherwise it's fairly simple (or you can just give the parts to your tire store staff to assemble). I like how the receiver is small and designed to sit on top of the dash rather than stick off the windshield. The velcro is fine (or you can use 3M "dual lock" tape for a more secure attachment) and it's nice and clean/low-profile sitting on my dash.The receiver is actually, unlike what a reviewer stated, easy to program yourself. You just let some air out of each tire (a few psi should suffice) one at a time to "assign" each sensor to a specific tire location (e.g. front left wheel) and it beeps when it registers that sensor to let you know, and you go through the rest of the tires and you're done. The receiver is easy to use and it is easy to cycle through to see the pressures (in psi rather than out of four "bars") of all the tires in sequence (+/- spare tire also). I like how you can set the pressure below which the alarm sounds.Also, importantly it seems (although I haven't tested to confirm) that a faulty sensor is reported as such to the receiver rather than the last pressure reading showing that could be totally inaccurate (and which is the major reason why I avoid TyreDog TPMS products as that is exactly what they do if a sensor stops working).The only weaknesses so far is that the receiver has no available backlight at all, so it can be difficult to read without taking it off the dash and looking at it from point blank range. The batter life of the receiver is an unknown at this point but it does turn off when the car is inactive and without a backlight I would hope it would last a decent amount of time (of course, YMMV depending on how much/often you drive the car and keep the sensors/receivers working).Great kit overall and the only one I'll use in my pre-TPMS requirement car!
M**T
Pretty good, but a slightly confusing interface.
I've had this installed for over a year at the time of this review and it's still working well. The provided AA batteries for the receiver went flat within a few weeks, but I've only had to replace them a few times since then. (Just dead batteries, not an overly hungry device.)I've saved myself from a ruined tire a few times with an aftermarket TPMS. (I had an Orange unit before this, and while I preferred its display I wanted to see if the sensors with this one might last longer.) Both my Orange and this Schrader have alerted me before I've gotten to the street when I've had a low tire. I've only ever gotten slow punctures, so I'm able to air them back up and get to a tire shop to have them patched. It's annoying, sure, but beats the heck out of destroying a tire and having to buy a new one.I misplaced my manual for this thing, and annoyingly they don't have it on their website. WHY NOT? If you call and ask they'll email it to you, however. So you don't have to, I'll provide my:===== CONDENSED INTERFACE MANUAL =====First off: You can set the pressure and temperature alarm separately for the front and rear axles (the spare, if you've bought a sensor for it, uses the rear axle setting). The temperature you enter is when the alarm will go off, but the pressure you enter is NOT the pressure at which the alarm will go off! The alarm goes off at 75% pressure, so if you want a higher alarm pressure adjust your setting accordingly! (Multiply your desired alarm pressure by 1.33 and use that as your setting.)There's a tilt switch or something in the display that will turn it on after some movement. It will briefly illuminate all three warning lights: Low Pressure, High Temperature, and Sensor Low Battery. (Consider that a self-test, even though they're LEDs and are unlikely to ever burn out.) It powers on in Display Mode.In Display Mode you can use the buttons like so:UP/DN: Choose which wheel sensor to display pressure and temperature for.LEFT: Turn the backlight on and off. (Auto power off after about 20 sec.) It's a toggle, so don't hold it down, especially since holding LEFT switches to Menu Mode! This can be confusing!RIGHT: Toggle "ROTATION" on the display. Every second it will automatically switch to showing the next tire.OK: Temporarily silence the alarm.So, it's the Menu Mode that gets confusing, but it's actually fairly straightforward. I think it's confusing mainly because I would unintentionally end up here by just holding the backlight button. You can exit Menu by holding LEFT again. Assuming you actually want to change some settings, you'll want to...Hold LEFT (which has an "M" on it, presumably for "Menu") to switch to Menu Mode. The battery level indicator on the display will disappear.Now you have a list of settings that you can choose from by pressing DN/UP:** USER SET (front): Press RIGHT here if you want to set pressure and temperature for the front tires. Use UP/DN (no, it doesn't wrap around, you have to press up nine times to get from 0 to 9) to change each digit, and RIGHT to go to the next digit. Pressing left does not go back a digit, it exits without saving! Keep going right until you've got all six digits set, then press OK to save.** USER SET (rear & spare): Press RIGHT here to set the rear (and spare) tire settings. This works just like the above.** ID LEARN: Press RIGHT here if you need to program sensors to the device. You are apparently supposed to do this for all four (or five) sensors even if you're only changing one of them. Each of the four (or five) tire icons will flash in turn. Deflate that tire by about 1PSI and the unit should beep and the flashing stop. Press RIGHT to move to the next tire and repeat. After all four (or five) sensors are set, press OK to save.** EXCHANGE: Press RIGHT here for a tire rotation. Additional presses of RIGHT cycle through LF, RF, RR, LR, SP. Use UP/DN at each position to set the sensor number at that position. After each is set, press OK to save. (Or get this all mixed up, LEFT to give up, and just do "ID LEARN" again, which is an easy option when the tire shop always inflates your tires higher than you wanted and you have to deflate them some anyways.)** (SPARE TIRE): Press RIGHT to change this setting. Enable (UP) or disable (DOWN) the spare sensor. Unless you actually have a sensor for your spare tire leave this off or it will be eternally upset about your "dead" (missing) sensor! Press LEFT or OK to save. (I don't know why LEFT actually saves on this one. Inconsistency!)** UNiT: Press UP/DN to choose kPa, PSI, or bar. Press RIGHT. Use UP for C or DN for F. Press OK to save.If you've saved (OK) or cancelled (LEFT) on one of the above, you'll be back in the list. You can choose another. You can press LEFT in the list to go back to the beginning of the list. To actually exit Menu Mode and go back to the normal Display Mode you need to hold LEFT.Note: For initial set-up, don't run through the menu in order. Do UNIT, SPARE (if you have a fifth sensor), ID LEARN, and then USER SET (front) and USER SET (rear).===== END OF CONDENSED INTERFACE MANUAL =====
G**.
They work great but the display causes glare and its way too ...
This is my second set of aftermarket TPMS . They work great but the display causes glare and its way too small to read in any environment. Granted its lighted, but you have to press a button fore it to workmy first set of aftermarket TPMS was this Orange Original P409s Tpms Monitor Tire Pressure Kit & Temperature Standard Valve 4 Sensors its a wired version but it really worked great, simple and could be seen in any condition.
A**N
Junk
This thing won’t find all the sensors unless it’s laying on the back seat. I tried it everywhere. Not like it’s a cheap purchase or I’m likely to get the sensors back out to try send it back. Easier to check the tires with a gauge every day than this junk.
A**R
Best aftermarket tpms solution
I recently bought a new car that did not have tpms. Tpms is not legally required in Canada. After researching aftermarket systems for weeks, I bought the Carchet system with external sensors. However, after trying the system I was unimpressed. The main problem was the large sensors that you attach to your tire valve stems. The sensors are huge and look a bit funny on your wheels. The other concern is that there is a locking nut on the sensors that requires a special tool to remove. If you lose that small tool I am not sure how you would get the sensors off the valve stem. Give these concerns, I ordered the highly rated schrader retrofit kit. Before doing so I contacted schrader to make sure the it would fit on my car. The schrader folks are wonderful and responded to me very quickly. In short it will fit most cars with standard tire valve stems. The kit came very quickly. I took it to my local tire shop who said that the sensors were the same ones found in factory installed systems. The install was very quick and inexpensive. The sensors go inside your wheels so having a professional install and rebalance your tires is a very good idea. Once back home I programmed the small external monitor. The programming is very easy if you follow the enclosed step by step directions. So far the system works great. The readings are accurate as I compared them to my tire pressure gauge. I will update if anything changes. However, this appears to be the closest thing to a factory installed tpms you can get.
M**C
Budget race data system.
Easy to use. The temperature display was an unexpected bonus. I use the TPMS for my Porsche at the race track. The temperature readout aids in setting the ideal pressure for the track. The temperature read out is also a useful source of information. ie: I need to get a limited slip differential now because I can see the temp buildup in the right rear runs hotter than the left rear.
Trustpilot
4 days ago
2 months ago
