📚 Scan Smart, Live Bright!
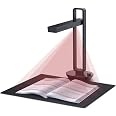
The CZURAura Pro Portable Book Scanner is a cutting-edge A3 document scanner designed for both Mac and Windows users. It features advanced flattening technology for curved pages, ultra-fast scanning at 2 seconds per page, and intelligent auto-detection for seamless operation. Additionally, it includes a multifunction desk lamp with customizable brightness and color modes, making it perfect for both home and office use.


| Minimum System Requirements | Windows 7 |
| Standard Sheet Capacity | 1 |
| Paper Size | 16.5 x 11.7 Inches |
| Optical Sensor Technology | CMOS |
| Connection Type | USB |
| Resolution | 1300 |
| Supported Media Type | USB |
| Scanner Type | Document |
L**E
Great portable scanner to take to libraries/archives when doing family history research
I bought this scanner to help with my genealogy research. I often go to libraries/archives and use my phone to take pictures, so I wanted a scanner that was portable and would be allowed at those places (i.e. wouldn't damage old books/documents by pressing them onto a flatbed). I had been using my phone, but I don't like the disadvantages (it doesn't always take the best photo, and I hate the auto file naming, so you have to later figure out what you've got) so I was ready for something new. I'll review the scanner itself separately from the software.The Scanner (5 stars)The scanner does a high-quality job on scans of most documents and books.It's super easy to set up - just plug in the cords and go. It does need to be plugged into a wall outlet.I had no problem laying out the mat and having it stay flat which another reviewer complained about. I simply rolled the mat in the opposite direction, then laid it out on the table.The scanner is light-weight, so will be easy to transport to archives and libraries.The foot pedal is helpful for pressing "scan" when holding a book open. It has a felt-like bottom, so it doesn't slide on wooden floors. It's not a required piece of the scanner - you can use the scanner without the foot pedal.When scanning glossy pages (like those in page protectors) or photos, the side lights are a must. Without the sidelights, the top light reflects and you get a huge glare in the middle of the page. Using the sidelights mainly eliminates that glare. You do still need to check the positioning of the page, though, because a reflection of the lights themselves can be seen if you're not careful. The side lights were one of the reasons I picked this model.I like the way the camera arm folds into the center of two upright supports. It'll be perfect for looping my Kensington lock through and locking the scanner with my computer in case I need to step away from a library table for a few minutes. This was another reason I picked this model.The scanner software does a fair job of eliminating the cots from a page. However, just be aware that it doesn't work perfectly in all cases. One of the books I scanned has a flower border on many of its pages. The cots were automatically blurred out but the software obviously can't reconstruct what was under them. But it worked better than I expected on that book.The Software (4 stars)The installation was easy. If you provide your email address, you are provided a link to tutorials to help learn to use the software. For the most part though, the software is simple enough to use without needing them. The FamilySearch Library in Salt Lake City provides CZUR scanners, so if you've been there, the software will feel familiar.When scanning, you have the option to choose single pages, facing pages (like a book), manual selection (i.e. choose which portion of the page you want scanned), or combine sides (used for IDs to combine both images onto one sheet of paper). I haven't used the combine sides option, but the others all work great.The software does a fair job of OCR - although, it had trouble reproducing an 1990s-era computer printout which was justified into Word. The large spaces between words seemed to give it some trouble. The same printout, when exported as a Searchable PDF allows search as you would expect, so it was the layout that was the problem, not the OCR. I was able to load in pictures of a multi-page document that I had taken on my phone and the OCR did a fantastic job given the pages weren't overly straight, and some were skewed quite a bit.There are several options that you can perform on one or multiple images - rotate, crop, rename. You can also adjust the contrast, sharpness, and modify the color settings.You can load in a folder of images (even if not scanned by the scanner) and can use the software to manipulate them and export them. I've done this on some scans made on my phone. It's also nice because you can scan now, export later.Some software drawbacks (and why I only give it 4 stars)When scanning multiple books / documents, you can choose which images you want exported - either "all" or a selection. If I'm scanning large documents or a chapter of a book, I'd rather each get their own folder. The only way I've found to do that is to shut the software down and restart.The software uses its own style of UI (i.e. different look-and-feel from Windows / Mac). For pop-up windows, you need to be aware of which button is the default. For example, when prompted to overwrite a file, "cancel" is the default, but in other cases, "continue" is the default. In all cases the continue button is the one that appears "highlighted" (it's blue). So, hitting <return> may not be what you want, using the mouse is the best way to make sure you are selecting the correct button.There doesn't seem to be a way to rearrange images in the viewer. You can do so right before you export (you need to click the "Show Sort window" box). This is a bit clunky if you have a large book - the window is of a set size, and is hard to read page numbers in it. And the software doesn't remember the order, so if you want to produce both a pdf and a word document, you have to redo the sort. On the plus side, this is mainly just a limitation for documents scanned previously. If you are in the process of scanning a book (or have just finished), you should double-check each page. For pages that were not scanned well, or accidently skipped, you can use the "Rep" to replace the image or "Ins" to insert an image. This means that you really shouldn't need to rearrange the pages right before exporting.
J**P
excellent OCR, usable for photo albums
So far I have used this for two purposes:1. I scanned a nineteenth century pamphlet with history of a branch of my family. I was amazed at how good the OCR (optical character recognition) was. Not only were all the words identified and spelled correctly, but the typefaces were a very good match to the original.2. I scanned two photo albums. This is not what this scanner was designed for, but it worked as well as anything else I have tried, and it is faster to use than my previous methods.Ideally every photo would be scanned individually on a flatbed scanner. Those usually offer you 1200 dpi resolution, although I think that 600 dpi is good enough. This (planetary) scanner doesn't reproduce photos that well; I would guess 240 dpi. That resolution reproduces the photos usefully, but where this type of scanner shines is that it preserves the context of the photos: photo albums group pictures together according to subject and date, and usually have captions. You have to scan a whole page at once to get all that context. I would rather have only a full-page scan at 240 dpi than individual scans at high resolution. Both would be better, of course.Here are some tips for scanning photo albums with this scanner:1. LIGHTING is critical. Photos are shiny, they reflect lights as glare - you *must* turn off the scanner's overhead light. I scanned in a large room with huge windows, providing lots of very diffuse light. That's the ideal. If you don't have that, try to light evenly from low on the sides. Copying other photo albums with a camera, I have successfully improvised such lighting with a pair of bar-shaped lights made to be mounted under a kitchen cabinet.2. Use the "color" setting even for black-and-white photos. Picture quality is poor if you use the "grayscale" setting.3. Many photo albums have black paper which matches the black mat which comes with the scanner. So the scanner has trouble finding edges. I put two strips of white paper along the sides of the album to help the edge detection.
P**R
A Decent scanner for the Amateur archivist
Like:-Easy to setup and install-Good Quality images-Automatic OCR-Supports several output files- Fast ScanningNeeds Improvement-Auto enhance sometimes removes pages or rearranges the text-Instructions are a little clunky-Hard to get back into box-Finger remover doesn't always get it 100%-Software is a little unintuitiveOverall this is a good value if you're an amateur archivist and don't need it to be perfect. The pro one might be better but I haven't tried it. It worked well for my needsCZUR if you're reading this, your book scanner is awesome and I love it. My main complaint is that its hard to get it back in the box. In your next version add a small bevel to the foot pedal and power adapter so the user can wrap the cord around it. I have included a mockup to give you an idea of what i mean.The Mat could use a box or something so it stays rolled up, maybe velcro straps instead of paper ones . Or some kind of dowel to make it easier to roll.You also have some extra space in the foam packaging that you could make little cut outs for the plug adapters as well. Again, love the product, but putting it away again could be easier.
Trustpilot
1 month ago
2 months ago