📚 Bind with Confidence: Elevate Your Document Game!
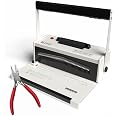
The TruBindCoil Binding Machine is a versatile and efficient tool designed for medium volume binding. With a punch capacity of 20 sheets and the ability to bind up to 440 sheets, it features an electric coil inserter and adjustable side margins for precise alignment. The machine includes 46 fully disengageable dies, making it suitable for various paper sizes, and comes with a 2-year warranty for peace of mind.
| Material | Plastic |
| Color | WHITE |
| Brand | TruBind |
| Item Weight | 15 Pounds |
| Hole Count | 20 |
| Operation Mode | Electric, Manual |
| Sheet Count | 20 |
| UPC | 742415918593 |
| Manufacturer | TruBind |
| Item Weight | 15 pounds |
| Product Dimensions | 18 x 15 x 10 inches |
| Item model number | S-20 |
| Is Discontinued By Manufacturer | No |
| Material Type | Plastic |
| Manufacturer Part Number | TB-S20A |
J**O
Excellent Machine for the Money
If you are thinking about getting this for high-volume commercial use, it may not be the best choice. For home use or low to moderate volume commercial use, I don't think you can go wrong for the money. There are specific aspects of this machine that probably deserve separate attention:PackagingOne reviewer pointed out that the electric coil inserter and the silver drum underneath came damaged. While I’m sure that Amazon will make good on this, I was a little bit concerned since I have on occasion purchased marginal quality devices online without realizing it. One of the key markers of this type of inferior quality is its frequency of arriving broken. The outside box that my machine came in was pretty beat up. I think this may have been because our 4 fairly large dogs met the deliveryman in the driveway and I have a feeling he just tossed it out of the truck. Nevertheless, I found that Amazon, as usual, had done an excellent job of packing. The outer box contained cushioning material which surrounded an inner box. The machine itself was very securely packed with foam inserts. I found absolutely no damage or malfunction to the device whatsoever.DocumentationThank goodness for YouTube. The documentation with this device was practically nonexistent. It came with an 8.5 x 11 sheet of card stock which was folded in half as its full user manual. Something like what you normally would see for a “quick start guide”. All it really said was basically you put the sheets in, you punch holes and then you put the coil in. There is a small tab sticking out of the left side of the machine with no indication whatsoever as to its purpose. It actually turns out to be an adjustable guide so that you can switch from a 4 ½ mm border to a 6 ½ mm border if you want the holes a little bit further away from the edge of your sheet. There is a fuse holder in the back of the machine which is also ignored in the instructions but if your electric coil inserter seems like it’s “dead”, this is where to check the fuse. Right below the fuse is a removable tray where the little circles go that are punched out of the paper. It pulls out towards the back. This is also something that was ignored in the instructions and is not immediately obvious.Construction QualityThe housing and work bed are plastic. This is okay though because the working parts of the machine are quite heavy and appear to be quite sturdy in construction. Some of the individual punches appeared to stick slightly on retracting but I’m sure this will improve as it “wears in”. By the way, the punches are lubricated and will stain the first few sheets that you punch. If it is an important presentation, you definitely want to cycle the machine a dozen or so times with scrap paper before you use it on important work. It is rated at 20 sheets punch capacity with 20 # stock. I think this may be a bit of a stretch. I did do 20 sheets of 18 # stock successfully but I would not want to do it on a repetitive basis both for the amount of effort involved and the strain on the machine. 15 sheets at a time is probably more reasonable. I really like the full handle design on this device. Many of the machines out there have a single crank type handle on one side. I can’t imagine punching holes in 15 sheets of paper with one of those devices without having it twist from the torque.FeaturesAs mentioned above, you can adjust how far away the holes are from the edge of the paper. Any of the punches can be disengaged so that you do not have any holes overhanging the edge of your sheet. It is not necessary to disengage all of the ones you’re not using, just the last one at the edge. (The last job I had “professionally” bound at Staples completely ignored this and all of the books had holes hanging off the edges of the sheets. Did not look very professional at all.) There is a gauge printed on the front bed of the machine that you can lay your sheet on to see exactly where the holes are going to fall and which, if any, punches you need to disengage. There is also a printed guide that tells you what size coil to use depending on the number of pages you are going to bind. This is handy but it would be nice to have a feature like I saw on another machine where you simply slide the document that you want to bind into one of several slots to see how thick it is and what size coil to use. You’ll notice that the tabs which are used to disengage the punches are not straight across, they arch upward. This is because the punches do not engage simultaneously but rather the edges engage first and then work their way to the center. This is an excellent design feature. It eliminates having to exert a huge amount of force to punch all of the holes simultaneously.Ease of UseThe hole punching part is pretty straightforward. You line your pages up with the adjustable guide on the left-hand side, check to see if you need to disengage any of the punches using the circles printed on the bed and if you do, you simply pull out the silver knob of the punches that you want to disengage. Slide the pages all the way to the back, press down on both sides of the handle and you’re done. I have seen a lot of comments with regard to the electric coil inserter. Yes it does run fast. Yes it probably would be easier to use and just as effective if it was half the speed and yes it does take a little bit of practice. Unfortunately, here once again the instructions give you practically no guidance. The most important part is to manually insert the coil through the first 3 or 4 holes. Then gently press the coil against the rotating rubber drum engaging the loops of the coil in the grooves of the drum. Rest the coil on the silver roller for support. It is important that you press gently and evenly on the rubber roller. You may have to put a little bit more pressure on the left side of your document. If not, the tip of the coil has a tendency to slide under the last few pages on the top of your document instead of coming out the hole and going around again. Obviously it is also important to keep the pages of your document lined up as evenly as possible so the holes line up evenly and don’t snag the coil as it’s going through. I generally put a binder clip on each side of the document to keep the pages lined up while I am inserting the coil. If you follow these tips, you shouldn’t have any trouble after you get a little bit of experience. The machine comes with a crimping pliers that simultaneously cuts the excess coil off and crimps the end so that it doesn’t come out of the book. It is extremely easy to use, just make sure you have it oriented in the proper direction otherwise you will crimp the part that you cut off instead of the part that stays on the book.Final ThoughtsPlastic coil binding is a very cost-effective and functional way to bind loose papers semi-permanently. The cost of the coils ranges from $.13-$.25 apiece when purchased in quantity and depending on the size of the coil. It is possible to reuse them, so long as you don’t cut them too short when you put them in. If you are getting ready to throw the book away, simply snip off both crimped ends and place it against the spinning drum and it will spin the coil off in a couple of seconds. (It is actually faster and easier to remove them than to put them in) Coil binding is more functional than comb binding because it allows you to fold the book over on itself and lay it flat. It is as cheap or cheaper than using plastic report covers and the pages are much easier to read. I definitely recommend this machine for the intermittent user.
A**M
Excellent. Does the job!
This is an amazing machine. I wanted to have one for a long time and now I wonder why I waited!Essentially this machine punches holes into papers so that you can thread a spiral binding through the holes.This comes with a little clipper so you can clip the spiral rings and crimp them. You will need to buy your own spiral binders.Some things to think about:What kind of binding do you want? Comb binding is big and plastic. This one is a spiral binder. I wanted this type of binding because it seems like it would last longer than the plastic comb binding and it is easier to use when you want to flip pages back and forth.The number of holes per inch you want in your papers. It is my understanding that a 4 to 1 ratio is traditional and that is what this machine does.The number of pages you can punch with the machine you buy. This one says about 15 sheets if you are using typical typing paper/printing paper. I would say that is fairly accurate. I didn't count the number of papers, I just simply grabbed a small pile and punched. When I got too many papers I found I had to stand up and apply some pressure to get the puncher to complete the job.Do you want a special threader? This one does not have it. This machine is also a little bit cheaper than ones that have a special threader. Once i watched a few videos I felt comfortable buying this machine and saving myself some money. Essentially you punch holes in your paper, clip them together with a binder clip or two, then you twist the spiral into the little holes. Once you get it through the first hole, it twists right on. I was able to put together 5 books with over 200 pages in less than an hour while watching tv. It was that easy.i have put together my own daily journal and I plan on doing my own cookbook wiht all my saved recipes that I have stashed here and there. I have put together several spiral books for others and there are many other ideas.
A**N
Very sturdy. Easy to use
I love using this machine for binding my journals, notebooks and planners. It's sturdy and keeps in place wherever you set your holes. You can't do very many pages at a time (around 12-15) but that's fine for my needs.
M**.
Well Built Coil Binding Machine
I just purchased the TruBind TB-S20A, I originally was going to buy straight from the manufacture for $10 less but after shipping cost the better deal was through Amazon.I had recently bought a different brand Coil Binding Machine and it had a handle on the right side of the machine which was hard to pull and I could only punch up to 5 pages at a time. The other difference was you could not pull the pins. I returned it when i received this one.I have already bound over 5 Books of 150 double sided printed pages. It is a great machine. Easily I could punch up to 15 pages it says 20 pages. This Coil Binding Machine is well built and easy to use. The punch tray is in the back of the machine. I emptied it each time I punched as the manufacture suggested.COIL ROLLER - Works well, with the bigger books my coils did not line up or the plastic coil was not thick enough to grab hold. So I rolled them by hand. I'm hopefully going to get to use the roller at some point. I'm sure there is a learning curve as well.BINDING CRIMPER - I am a lefty. The instructions say to make sure the red dot is on top when crimping. For a Right handed person that may work. I went to You Tube and watched "How To Properly Crimp A Coil Bound Book" a great tutorial I must say. In the Tutorial it said to turn the crimper over where the red dot is on the BOTTOM if you are left handed, that worked well for me. It is still a learning curve to get it to crimp right but I got better by time I hit the third book.
Trustpilot
5 days ago
2 weeks ago