


🎶 Build, Amplify, Shine!
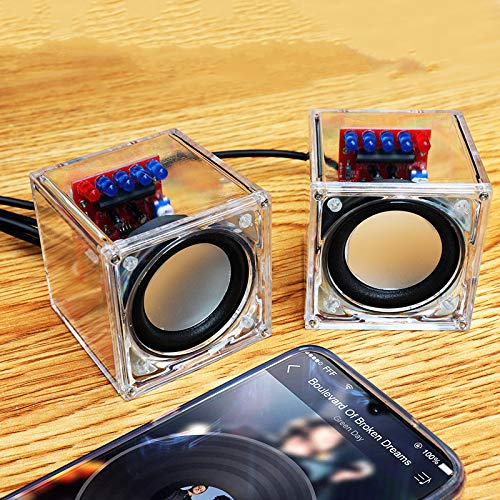
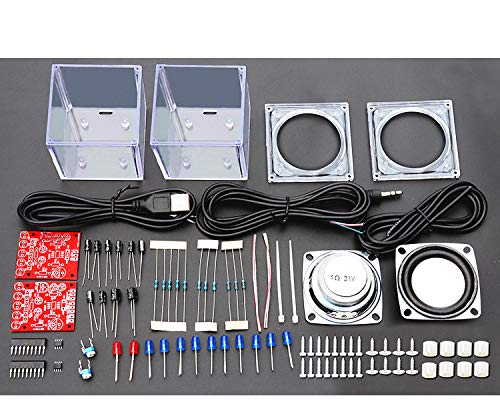
The Gikfun Upgraded USB Mini Amplifier is a DIY kit that combines fun and functionality. With a transparent shell and LED lights that sync to your music, this compact speaker delivers 3W per channel of powerful sound. Easy to assemble with included components, it's perfect for tech enthusiasts looking to create a unique audio experience.
| Manufacturer | Esooho |
| Part Number | 8541737907 |
| Item Weight | 1.76 ounces |
| Package Dimensions | 5.2 x 3.66 x 3.27 inches |
| Country of Origin | China |
| Item model number | 8541737907 |
| Is Discontinued By Manufacturer | No |
| Color | Transparent |
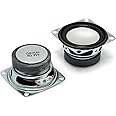
| Material | Iron |
| Power Source | Corded Electric |
| Voltage | 110 Volts |
| Item Package Quantity | 1 |
| Special Features | Transparent Shell, Shining Lights, LED Lights that illuminate according to the music spectrum |
| Usage | For Music Players, For Smartphones or Tablets, For Computers |
| Included Components | Nuts, screws and other components |
| Batteries Included? | No |
| Batteries Required? | No |
D**Y
Awesome kit.
I got this for my first ever soldering project. It was allot of fun. It took me about 4 hours to complete. 3+ hours of that time were spent on the first speaker because I didn't follow the instructions properly and had to desolder some things.The instructions were vary easy to follow making it a great first project.The speakers sound great for the price. Much better than I expected.I would recommend this kit to anyone looking for a little fun project.
M**O
Fun little project - have a faulty 3.5mm jack - otherwise great
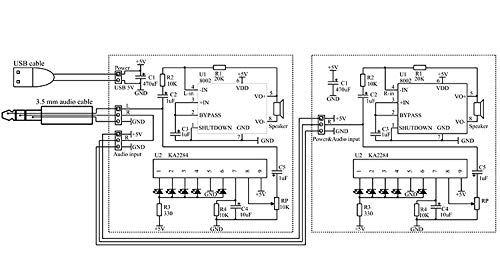
Some reviewers have said that this kit is difficult. There is one surface mounted component which is a little small, but not in terms of SMT components. The rest is through-hole and is pretty easy. I would say that the instructions are pretty good actually. They have good pointers for folks starting out in soldering and if you follow them you should be good on this kit. I assembled in this order and it worked out perfectly (with one exception mentioned below):1) Chip - (surface mount): tin ONE pad per instructions and then place the component on and solder that one pad/leg of the chip. Then do the rest - be sure to give it time to cool (30 seconds or so per solder joint). I was running at 350C and it went fine.2) Resistors (through hole)3) Spectrum chip (through hole) - I'm botching the official name of this component...4) Potentiometer (through hole)5) Capacitors (through hole)6) LEDs (through hole)7) Wires (through hole with tinning before) - be sure to follow the instructions on this one. I forgot to feed it through the speaker box hole and had to remove the wires and re-solder them (DOH!)I'm listening to these right now as I write this. They sound great.ONE PROBLEM - the 3.5mm jack that came with this is quite garbage. I've tried it on a couple different devices to drive sound and I have to jiggle it to make correct contact. It just feels loose when plugging it into the female connector. I've already ordered some replacement jacks and will cut the wire and solder a new male connector. If I have it *just right* it works fine and sounds great. But I want something a bit more reliable and solid.I'm using these as small computer speakers and for that they work great.Overall I'm happy, but apparently I still have some work to do (3.5mm jack) to get these where I want them to be.If you like projects like this and aren't too afraid of 1 surface mounted component, then the finished result is worth the effort. If you really struggle with surface mount soldering, maybe this isn't for you(?)
E**C
Great Value!
I picked this kit up just to learn a little more about electronics and to practice soldering. Figured I would like something that would also be useful when I was done. I was surprised that you get pretty nice speakers and LED lights that flash with the music for this price! I was even more surprised that I got it working on the first try. Other commenters have mentioned that the directions were poor, but at least on my board, every hole was marked with the part that goes in there. Took a little bit, but it wasn't too difficult to figure out what goes where.Also yes there is a relatively small surface mounted IC involved, but I was able to get it on the first try without too much soldering experience.
R**E
Almost worth it
This was a fun little project. Mixed types of soldering, which was challenging but good practice. Sound quality would've been fine, except one of the speakers arrived with a nice rough, already blown sound. The other works perfect. Also, the screws are just too cheap, three of the heads sheered off durning installation (be extra gentle). So yeah, fun project, just not quite worth the price/time.
Z**Y
A good solder practice kit to make a speaker set
A nice practice kit for making your own speakers.
B**7
Has SMD ICs although easy to build
I ordered this kit to kill two birds with one stone. Used one speaker to be used as some what of a Signal Tracer and the other is going to be used as a Mono Audio Amp for a small project.Anyway, works pretty well for my needs. Has no Volume Control however you can add one if needed. The circuit is super simple and the PCB Solder Mask has the labels for the Parts locations. A couple of the Acrylic parts are kinda off on the screw placements but I honestly don't care. Keep in mind the main IC is a SMD package and will require tweezers, Flux, small tip for the Soldering iron and .015 dia Solder.Don't expect this to amplify a Phone or whatever. However it does has some nice Mids and Lows compared to a Phone Speaker.
B**L
Not too bad..
I finally got around to assembling this -- it went together pretty easily. I think it would have been nice if they had starter stripped all the wires for you, but that's just a personal problem for me. I put them together and tried them out -- I got the light show, but no sound, With no idea about what could be wrong, I ran over the connections to the smd amplifier chip and that did the trick (I've never worked with a surface mount device before). Went over the second box and I had stereo. Sounded great with my iPod and a USB battery bank. Sounded crappy when plugged into the computer's USB port -- looks like I'm going to spend another 7 or 8 buck to try to get the noise filtered out of the power lead. Otherwise, surprisingly nice sound out of these (make sure the speakers are mounted tightly to the front, and the fronts are mounted tightly to the box - it really does make quite a bit of difference in the sound.Also DON"T USE 110 VOLTS ON THESE!!! ;)
C**N
Surprisingly Great
These speakers are some of the best I've ever seen for their size. While not bassy (obviously) they are not as echoey and tinny as I expected. Top-quality for songs that have a lot of highs like "Dancing Queen" for example. In terms of the DIY aspect, they were very fun to build and I had no issues with the PCB or parts. My only complaint is the potentiometer(s) inside the speakers does not control both speakers, and it is on the inside and not the outside. It would've been nice to have a small hole for them. Other than that, I highly recommend.
Trustpilot
2 months ago
2 weeks ago