Desertcart purchases this item on your behalf and handles shipping, customs, and support to Cayman Islands.
🚪 Upgrade your entryway game with Giani’s Honey Oak magic!
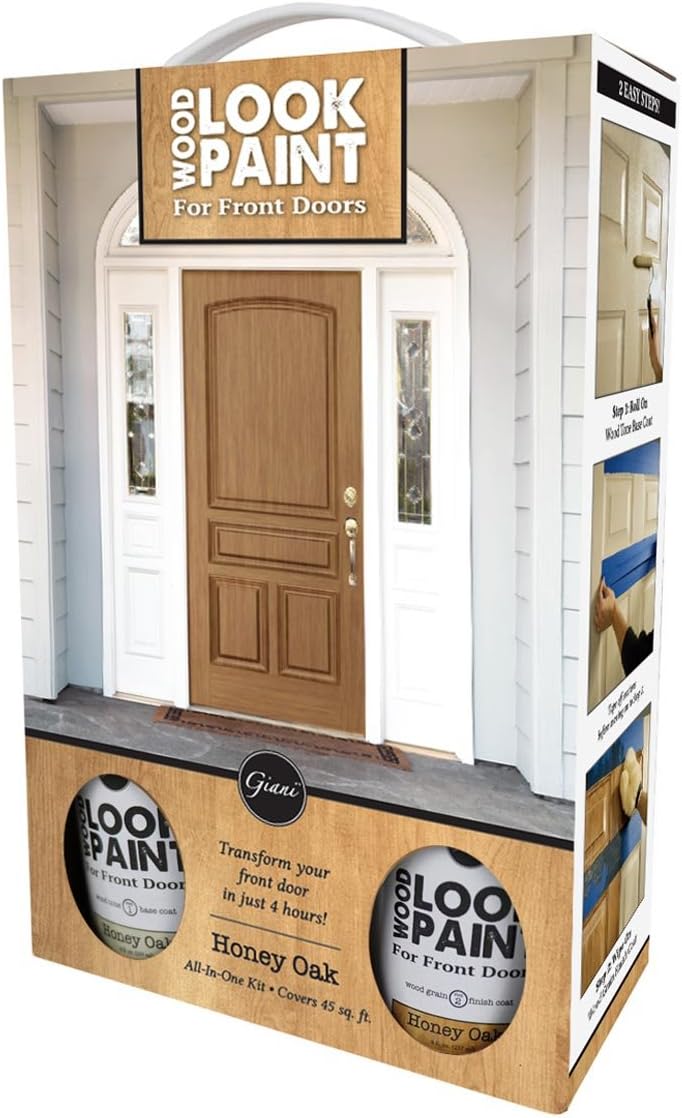
Giani Wood Look Paint Kit in Honey Oak delivers a realistic European Golden Oak finish for front and interior doors. Designed for painted steel, aluminum, and wood surfaces, this 3-step acrylic system offers a fade-resistant, water-resistant wood grain finish that fully cures in 4 hours. The kit covers 40 square feet and includes all necessary tools, enabling a quick, professional transformation without priming or replacement.


| Age Range Description | Adult |
| Asin | B077GX81GK |
| Best Sellers Rank | #10,672 in Tools & Home Improvement (See Top 100 in Tools & Home Improvement) #27 in Interior & Exterior House Paint |
| Brand Name | Giani |
| Color | Honey Oak |
| Color Code | #96612D |
| Container Type | Can |
| Coverage | 40 |
| Customer Reviews | 4.3 4.3 out of 5 stars (1,435) 4.3 out of 5 stars |
| Finish Type | Wood Grain Finish |
| Full Cure Time | 4 hours |
| Included Components | •8 oz. Honey Oak Wood Tone Base Coat |
| Indoor Outdoor Usage | Outdoor |
| Is Waterproof | False |
| Item Form | Liquid |
| Item Type Name | for Front & interior Doors (Honey Oak) |
| Item Volume | 500 ml |
| Manufacturer | Giani |
| Model Name | Paint Kit |
| Model Number | Wood Look |
| Paint Type | Acrylic |
| Part Number | FG-WL HON FDK |
| Size | 16.91 Fl Oz (Pack of 1) |
| Special Features | Fade Resistant |
| Specific Uses For Product | Interior |
| Surface Recommendation | Metal |
| Unit Count | 16.91 Fluid Ounces |
| Upc | 856512007446 |
| Water Resistance Level | Water Resistant |
User
BUY IT! 🗣️ YOU WON’T REGRET IT!
Let me start out by saying- I’m a full time working mom, living in a 50% finished home, with a limited budget and skill set. This side of the door took me at most 3 hours total to finish. I painted the interior side of our door as a test before moving outside, after seeing the results I’ll be doing every single exterior door we have 🥹❤️A few things to note:- to do this one side of the door, I only used about 50% of the product. There is easily enough left over to make the door darker and maybe even enough to do another side!- I saw a lot of comments saying the provided mitt was too large and some people had trouble with that. Personally I have small hands and I had no problems! I just cautious to NOT use the thumb portion of it, and I really only used the top part of the mitt.- Keep a dry paint brush handy!! Absolutely saved my booty trying to keep straight lines with the “wood grain” on the inlays. After you’ve used the mitt in the correct directions, go back in with the tip of the paint brush to smooth out your lines and remove any globs of extra paint. But make sure the brush is dry!- Originally I was going to go with the honey oak color, but decided to buy English oak after looking at all the reviews. The color definitely changes with each coat of step 2! I like the vintage “orangey oak” tones, and liked the first coat (first picture) but decided the wood grain wasn’t defined enough so I went back in for another (2nd picture). Glad I did but be aware if you don’t like the golden brown tones, I’d do 4 total coats.- WATCH YOUR TAPE LINES! I didn’t line up my tape properly when doing the individual wood directions, and I can definitely tell. But still looks wonderful!- TRUST THE PROCESS. Honestly I thought this was going to be the kind of project where you spaz out trying to get the lines perfect. But in reality I was able to do 1-2 swipes and fix up problems areas with the dry paint brush. This was WAAAAY easier than I expected.Please buy this! It will make you feel like you can fix up anything 🥹
User
Incredible find! Took all day but SO worth it
This kit is incredible. I’m definitely glad i read the reviews because the tips and tricks were helpful. My ONLY negative is that we waited more than the recommended hour to tape and the tape did peel up a few spots so i had to do some touch ups.I do agree with other reviewers that the glove is really bulky but we managed fine with it. I cut off the thumb at the end to use for touch ups.The stain coat wipes away easily if you go a little over your tape which was helpful when trying to make sure i got a crisp line.I’m a little nervous about it taking 7 days to cure since we use the door everyday but hopefully it doesn’t get nicked or scratched.We aren’t done yet as i still have to repaint the trim and clean things up but here is what it’s looking like so far. We did 2 coats of the stain to get the darker finish and since our door has a lot of glass we were able to use one kit for both sides of the door!
User
We Loved This Door Kit But Here's What We'd Do Differently
We are so happy with how our door turned out! This kit gave us amazing results, and we'd absolutely recommend it. If you're thinking about using it, here are a few tips that made a huge difference for us.First: Don't expect this to be a one-hour project (like I did!). It took us the better part of the day because we wanted to do it right. We carefully taped off every area, applied thin coats, let each one dry completely, and repeated the process. Taking our time definitely paid off—the finished result looks so much better because we didn't rush.••Biggest tip: Cut the glove! The glove included in the kit was way too big. I cut off the bottom half, folded the thumb inside, and secured it around my wrist with a small elastic hair tie. It fit perfectly and made it so much easier to control while applying the finish. Even my boyfriend, who has much larger hands than I do, preferred using it this way.••Tip #2: For all the detailed grooves and indented panels on the door, I cut the thumb off the glove and slipped it over two fingers, securing it with another hair tie. It worked perfectly for getting into all the little crevices and gave us much better coverage than using the full glove.My last piece of advice is to be patient. Let each coat dry before adding the next one, and use smooth, even strokes instead of constantly going up and down over the same spot. Trust the process and don't rush it.We absolutely love how our door turned out, and the extra time and attention to detail made all the difference. If you're willing to be patient, this kit can give you beautiful results!
User
This is a FAUX finish!
Color: I chose the Honey Oak color for my back door since the entryway flooring was honey oak vinyl. I felt the base color was very light and slightly pinkish. The stain color is OK, but I think the contrast between base and stain (I refer to it as stain, but it is really a type of glaze that creates the wood grain look) is too great and a less than perfect application is very noticeable. I wasn't totally pleased with the results, but intrigued enough to try a different color. I chose English Oak this time. The base wasn't that much darker, but it had a warmer tone and the stain was much darker.Door: Essentially, the door I was working with was in pretty sad shape and not worth too much trouble. Layers of paint collected in panels that couldn't be easily sanded had to remain and I couldn't remove the door or knobs in fear that it could not be rehung properly or locks function. Removing the door is not necessary, but definitely remove hardware if possible.Application: I learned alot from my first attempt!1. Base coat is easy, just straight painting. Directions say to pour half into a tray, but a little goes a long way and I just used it straight out of the can. Less waste/clean-up.2. Taping for the staining is key. If you have a panel door, you will stain in two directions. Instructions say to tape out horizontal panels, stain/dry and then vertical panels, stain/dry. I felt the inset panels looked messy when the whole panel was done horizontally. I took an extra step to tape out the vertical and horizontal sections of the panel and created the look of a mitred corner(I did this in the window corners also). Even though it's a crappy door, it made a difference.3. The graining mitt is huge! As a woman I don't have a small hand, but I was swimming in it and it was hard to control. I tucked the thumb to prevent it from creating unwanted strokes in the finish and I only applied stain directly to the end of the mitt (not the whole palm as instructed). The instructions say to dampen the mitt in water and wring out the excess. It was very difficult to wring it enough and the stain got watery and dripped excessively. Learning from this I only lightly damped the one side of the mitt I used.4. Use quick light strokes. Instructions say 2-3 coats depending on desired effect. I used four. (I might have done 5, but I was low on stain because I had also refinished the beadboard under the back door overhang. Looks great and only used 3 coats) The first couple coats might look a little messy, but as it gets darker with additional coats there is less contrast and it starts to look more natural. It dries fast, but with the extra coat I wanted to be sure the taped corners were dry so I did my vertical and horizontal sections on separate days.All said and done I am fairly pleased with the results, but I also accept it for what it is, FAUX!! I don't feel it would be worthy of my front door, but I am considering the garage door version. The kit is loaded with everything you need. It's too recent to really judge the durability, but seems pretty good so far.
User
It actually works.
I was so worried about this not looking right but I actually love it so much! The kit literally came with everything you need. Drip cloth, painters tape and all. I did my front door, both back and front sides. I had exactly enough for that. I onlyUsed one coat of the wood look paint and it reccomends at least 2 coats so I did order another can of that to finish it. But even with 1 coat I would have been happy! And I didn’t notice any smells either. Ignore the spot under the window. I did mess up there but I’m hoping that’ll blend in when I add the 2nd coat! And I’m sure someone with more experience could make it look better than I did. I didn’t know what I was doing but I still think it looks pretty good
User
Worth it!!
So happy with how this turned out and impressed how easy it was to transform my plain, boring door. This kit comes with everything you need. Only thing you need to get is a tray for the paint and sand paper if needed.
User
Great product
This kit came with everything needed - paint brush, roller, gloves, plastic wrap, stir sticks, mitt applicator, paint and stain. I watched the video on their page of how to apply and decided after watching that I would not be using the mitt. It looked awful from there so I used a chip brush instead. I was able to create more of a wood grain with. I used English oak and the color was beautiful - coverage was great. Drying time seemed pretty quick. I’m not sure how anyone wouldn’t have enough of their product to cover both sides of the door because I did without any problems. I’ll be buying more to do the interior doors of my house.
User
Liked the finish product , the process needs refining .UPDATED 11/28/2021
I’m a thorough reviewer so I’ll try to summarize as best as I can . Overall, I like my final product, I bought two kits of the black walnut for both sides of my front door. My husband was weary and couldn’t envision it working , but by the end he was a bigger fan than me. That’s not to say there weren’t issues.Issue 1 - tape; I was skeptical that the process could be so quick given the use of tape to section off vertical and horizontal sections. I just envisioned the painters tape peeling off freshly painted base coat sections. When I did the first side I was so happy that this wasn’t an issue. However, the same cannot be said for side two. I did these on the same day- one side after the other. On side two I had multiple issues of tape pulling up the base coat . I even waited a full day to go paint the horizontal sections and it peeled up the vertical wood paint on one small section. So, I think it’s kind of a crap shoot. - it’s worth noting that before painting or moving on I did feel and look to see if paint was dry- no rushing on my part.Issue 2- the mitt; I didn’t think there would be much to complain about with the mitt , but it ended up being the worst part of the project. So , as I was doing the first side I noticed that the mitt deposited a lot of little fuzz on the door. When I did the second side I wrapped the mitt with painters tape and took the tape off to get any loose fuzz, it lessened the problem but it still was still there.The worst part of the mitt was the size of it and the plastic coating that protects the inner part (where your hand goes) and the outside (where the paint goes). There is a plastic in between to keep your hands clean and this plastic makes the mitt almost move uncomfortably and it becomes harder to control your motions because the outside goes one way and the plastic goes another. It sounds weird until you experience it.The size is also just so large that it just makes it hard to control all aspects of the mitt. I know we want free flowing natural motion but the mitt doesn’t need to be that large- most 32-36 inch doors have small vertical and horizontal sections and this just makes it clumsy.Nevertheless, I would repurchase it as it does make the door look very wood like and have the effect I wanted. I will also say that these kits and another brick kit I bought from this brand are so complete and nice. They have drop clothes , full rolls of painter tape, which is a great deal. I would have liked a tray for this kit , but you can’t get everything. I would say give it a go, just be aware you might have a few issues.UPDATED: since about September with the air conditioning off I’ve been noticing a weird melted plastic / varnish smell in my home. The smell would only hit me in the middle of the day when the sunlight beat down on the front of my house. I smelled the door and sure enough it emits this weird odor now. I think the sunlight and heat makes the smell come around , but my air conditioning keeping the door cooled but also messing with the air hid the smell.
User
منتج رائع
المنتج ممتازواللون ثابت ومثل الصورة انصح به
Trustpilot
1 month ago
3 weeks ago