✨ Light up your lifestyle with luxe waves of gold and crystal brilliance!
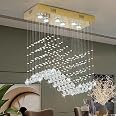
The CRYSTOP Modern Gold Wave Rectangular Chandelier is a 6-light flush mount fixture featuring a polished gold stainless steel frame and premium K9 crystal accents. Measuring 23.6" x 9.8" x 27.6", it supports dimmable GU10 bulbs up to 60W each, compatible with LED and energy-saving options. Designed for indoor use, it elevates dining rooms, kitchens, and kids’ rooms with a contemporary, elegant wave raindrop design, combining style and energy efficiency in one stunning centerpiece.


| Brand | CRYSTOP |
| Color | 08-Gold L23.6" x W9.8" x H27.6" |
| Material | Stainless Steel |
| Style | Contemporary |
| Light fixture form | Chandelier |
| Room Type | Kitchen Island, Bathroom, Bedroom, Living Room, kids room, Closet, Study Room, Entryway, Dining Room |
| Product Dimensions | 9.29"L x 3.86"W x 10.63"H |
| Specific Uses For Product | Home |
| Indoor/Outdoor Usage | Indoor |
| Power Source | AC |
| Installation Type | Flush Mount |
| Special Feature | Dimmable |
| Control Method | Remote |
| Light Source Type | Energy saving, Halogen, LED Bulbs |
| Finish Type | Polished |
| Shade Material | Crystal |
| Number of Light Sources | 6 |
| Voltage | 110 Volts |
| Light Color | White |
| Shape | Rectangular |
| Included Components | Mounting Hardware |
| Embellishment | Crystal |
| Lighting Method | LED |
| Wattage | 60 watts |
| Bulb Base | GU10 |
| Controller Type | Push Button |
| Switch Type | Push Button |
| Unit Count | 1.0 Count |
| Water Resistance Level | Not Water Resistant |
| Brightness | 360 lumen |
| Efficiency | Energy Efficient |
| Mounting Type | Flush Mount |
| Shade Color | Gold |
| Fixture Type | Non Removable |
| Assembly Required | Yes |
| Manufacturer | CRYSTOP |
| Size | L23.6'' x W9.8'' x H27.6'' |
| Model Name | 9004-G |
| Part Number | 9004-G |
| Item Weight | 19.01 pounds |
| Item model number | Rectangular Chandelier |
| Finish types | Polished |
| Special Features | Dimmable |
| Batteries Required? | No |
M**N
Gives a stylish and a modern vibe.
It is very easily to assemble. It comes with all the clear instructions so everyone should be able to assemble it. Can be mounted on your existing ceiling mounting box. You may need to install extra drywall anchors to hold it on the place which is not a very big deal.
M**M
Looks great
It’s very neat and beautiful chandelier;It might take a little time to assemble all the crystals, but it’s worth ur time and money!!!!
I**D
I love it
I bought it for my dining room and I have get a lot of compliments
L**N
❤️
Es muy bonito luce muy elegante
M**K
Looks like a $1000
Pictures do not do this justice. I took some close ups but you really cant see the details or the shine from the crystals. I really like this light. People think I paid $1000 for it....at a local store in Plano, TX they sell this type of light for $899 (what a ripoff). The crystals are very clear and the reflected light from them is excellent. However, the 5 gu10 50 watt halogen lights I used are not enough to make the dining room super bright (because they act more like spot lights) and therefore require additional lighting to make the room really bright (if that's what you want). But in my opinion there is plenty of light on the dining table. So why the 4 star rating? Well, like others have stated....it's a pain in the a*s to put together because you have to cut the packaging for each line, then untangle the wire. I had to order 3 of these (thank god for prime) because the first one had a lot of scratches on the chrome finish and some of the crystals where broken (sent that one back). Then I order a second one and the chrome finish had a long scratch on it. So I kept the second one and ordered a 3rd one and that one was much better (only had 2 tiny dings in the chrome finish that you can't see unless you just stare every inch of it down. I mixed and matched crystals in both of the boxes because there where so many that were either scratched, had highly visible imperfections, or the line was either too short or too long. I picked out the ones with the best ball crystals, but really couldn't do much as far as the small crystals go. Too many of those had imperfections and I didn't want to spend all day (took me about 3-4 hours with a helper) putting this up. Even thought the small crystals had imperfections they were not chipped or cracked, which is what I cared about on those. The ball crystals on the other hand had to be near perfect for me because they hang at eye level.My advice is that you order 1 and see if it has any scratches on the chrome finish. If yes, then order another one and hold onto the first one so you can swap out crystal balls or even the entire line. Not really sure why not more people have mentioned this. Maybe I just had bad luck, but come on? 3 of them with this many problems.....?1. Was pretty easy to hand on the wall, but do NOT use the cheap drywall holders they sent with it. Instead get the 50lb metal screw type holders. I bought eight of them. If you can put any screws in a stud instead, do so. This thing is pretty heavy to just hang off of the sheet rock. I was only able to align 1 of the 8 holes to a stud.2. Wiring was easy, except that you have 2 black wires and a ground. So you have to trace one of the black wires from where they attached it to the rest of the white wires on the light sockets. Don't know what they were thinking here except to save money.3. use the gloves to put the chrome finish on and make sure the screw heads are sticking out all the way. If not, gently push on them with a flat head screw driver so the chrome top panel sits all the way. You don't want this falling on your head with all that weight, lol. Be careful the screw driver doesn't slip and destroy the chrome finish.4. use the included gloves on one hand from here and start attaching the crystals. once you get to the first light socket, hang up all 4 lines of crystals and then put the light in. This is so that you don't struggle putting the rings into their holes right next to the light. You want to try and get as little smudge on the chrome finish as possible. They are a pain to scrub off. Do the same all the way to the end. With the hand that does not have a glove, grab the ring end of the line (the ring is like the one on a key chain except that it is very easy to pry apart) between 2 fingers and hook it onto the ring bracket attached to the chrome panel like you are adding a key to your keychain. This part was actually pretty easy.5. put both gloves on and scrub the big crystal balls to a shine.Would I recommend this? YesWould I buy another one to put in another room? Probably not for a long time (takes way too much effort).
C**I
Cost effective and very good looking chandelier. Needs to be patient when installing.
Installed this chandelier in place of a recessed light. Looks great and best bang for the buck. No questions.There should have been a template to drill holes on the ceiling included with the chandelier. It is difficult to hold the base and mark places to drill to put screw anchors, unless you have someone else to hold it for you. I got a piece of paper cut to the exact size of the base and marked the holes for the screws, used the template to mark the holes on the ceiling and then drilled the holes with a 1/8” drill bit. Of course, you have to align the template to your desired position first. After making electrical wire connections, installing the base was not that difficult.Before you start hanging the crystal strands, make sure to separate them into piles by the numbers 1 through 8. Also identify the crystal strands marked with a something like double arrow in the #3 and #6 (2 each) and #8 (1 stand). They have split “Y” shape wires to go on each side of the bulbs.After peeling the protective sheath, install the cover plate using the screws. Don’t install the bulbs yet. Start installing the strands from one end (five #1 strands). After you install the split-wire strand on #3 position, install the first bulb. Continue the process until you install all 80 strands and 5 bulbs. Instruction manual doesn’t give much details, but has a diagram illustrating how the strands are placed. “Threading” the split-ring through the hole in the shiny cover may be difficult if you don’t have fine motor skills ( it’s even more difficult with those cotton gloves: I used a pair of nitrile gloves).One important thing: do not use a sharp object (knife or scissors) to cut open the bubble wrap covering the strands. The coated wire is so fine and you could easily cut them. Best is to tear the bubblewrap open. Be very patient and don’t rush if you get neck strain while hanging the strands. Take a break and do it later. It’s worth it. Good luck
G**A
Lovely
I’m in love with this chandelier! It’s the perfect centerpiece for our dining room, making the space feel more modern and elegant. The quality is exceptional, and it definitely adds a wow factor to the room. Whether you’re hosting a dinner party or having a quiet family meal, this chandelier creates the perfect ambiance. I highly recommend it to anyone looking to elevate their dining room decor with a sleek, modern touch.
N**T
Pretty
Was short crystals
Trustpilot
3 weeks ago
4 days ago