🚀 Connect, Code, Conquer: The WT32-ETH01 is your gateway to next-level embedded innovation!
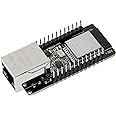
The WT32-ETH01 Development Board by BSROBOTIC integrates a powerful dual-core 2.4GHz Xtensa MCU with tri-mode connectivity—Ethernet, Wi-Fi, and Bluetooth—enabling versatile, ultra-stable, and low-power embedded solutions. Supporting multiple TCP/UDP socket modes and seamless firmware upgrades, this compact board is tailored for professional developers seeking reliable, flexible IoT and networked device development.


| Processor | 2.4 GHz arm_dual_core_cortex_a9_omap_4 |
| RAM | SRAM |
| Wireless Type | 802.11abg |
| Brand | BSROBOTIC |
| Series | WT32-ETH01 |
| Item model number | WT32-ETH01 |
| Operating System | FreeRTOS |
| Item Weight | 5 ounces |
| Product Dimensions | 2.5 x 1.8 x 0.7 inches |
| Item Dimensions LxWxH | 2.5 x 1.8 x 0.7 inches |
| Color | pink |
| Processor Brand | Espressif |
| Number of Processors | 2 |
| Manufacturer | BSROBOTIC |
| ASIN | B0BYXJTWPB |
| Date First Available | March 10, 2023 |
K**J
Works as it should
Works great. Make sure you get a good programmer for it, because it doesn't include a USB port. I use the wESP 32 Prog C, which includes the auto-program circuit that lets you upload programs without needing to manually reboot the chip or put it into programing mode.Something I didn't know before buying: this board doesn't support power-over-Ethernet.
S**N
Fun little board.
I really have fun messing around with these and setting up christmas lights.
D**L
Great! Programmed with ESPHome
Just what I needed! An ESP32 board with built in ethernet to get all these chips OFF my wi-fi. I was able to program them serially with ESPHome, enable SPI communications, and link them to the circuitsetup 6 channel energy monitor boards to bring power data into Home Assistant.
Z**R
Works as intended, can't beat having Wifi, Bluetooth, and the ESP32 all in one package.
I'm a big fan of microcontrollers and doing simple projects with them, both for practical around the home tasks and to spend quality learning time with my kids.These boards are perfect for both of those roles as it can do things like monitor humidity levels in my basement and communicate them back over Wifi, or just control an array of LEDs to blink in cool patterns to incoming audio for my kids to gawk at.The price for the features you get is great, but I do wish there was better documentation of those features and how to use the board from the manufacturer. Took me awhile to get around to even using this board because that initial learning curve was a turn-off.
D**G
Excellent experimenter's board
I've been wanting to play with the ESP32 for a while now, so when I saw the WT32-ETH01 Development Board Ethernet come across my feed, I snapped it up. While not exactly what I was expecting, I am still happy I picked it up. My impressions:- It's very small! In my career I've done a lot of work with embedded systems, but that was many years ago, and the embedded boards were pretty good sized. This one is a fraction of the embedded systems I've worked on, and it's much more feature rich. Nice!- I like the wifi and bluetooth support included with the board. Many of the boards I've looked at did not have any external connection, other than a USB port to use for development. This board is much more complete!- While the documentation is sparse (or non-existent), there is plenty of information about the board available on the vendor product page and on the Internet. I've been able to learn quite a bit about this board, both it's configuration and via tutorials, from the documentation that is available. This is in strong contrast to other boards I've looked at, that have sparse documentation and limited information on the Internet.I really like this board, though for full disclosure I haven't yet used it in anger. I've played around with some of the functions and validated the development environment. However, I have a good feeling about this and I expect to have a great amount of fun exploring. Recommended for those that have experience with embedded systems; for those without experience, this board can still be a fun project, but the learning curve will be significantly higher.
A**.
Smallest ESP32 board with Ethernet I know of
This is a little module featuring the popular ESP32 microcontroller with a main selling point of offering onboard Ethernet circuitry. Adding the support components needed to implement Ethernet is not trivial, and this is a great solution that allows you to focus on your project while leaving the tricky Ethernet design to someone else.Information is out there on this module, but it's a bit scattered. I recommend searching for "wt32-eth01 bits and bobs"; someone on GitHub has posted a really helpful set of information about this device that I found useful when getting up and running.A few gotchas apply that I'd encourage you to review at that link. The onboard voltage regulator isn't really suited for 12V and you should stick to 5V or 3.3V input; there is no onboard Power-over-Ethernet circuitry, so you'll need to apply your own power, and many pins have restrictions because they're used for startup of the ESP32 or for the Ethernet circuitry.Finally, it's particularly important to note that this device doesn't have an onboard USB-to-Serial converter - meaning you'll need some sort of solution for flashing it! A standard USB-to-Serial converter will work, but you'll need to supply that separately, and you'll either need to break out the necessary pins to a header on the board you plug this into, or you'll need to put this module in a socket so you can pop it out when reprogramming is necessary. Make sure you use a USB-to-Serial converter that's set to operate at 3.3V!
B**5
good board but no vendor documentation
NOTE: I am reviewing this as a "generic ESP32 development board with wired Ethernet", while the stated function of this board appears to be to use it with the stock firmware as a "serial to Ethernet" adapter. I did not try and am not reviewing the stock firmware functionality.After reading my initial, unfavorable, review, the manufacturer got in touch and provided some useful references and a replacement board. Most useful was the github page by "egnor" labeled "wt32-eth01". With the help of this page I was able to flash custom images (I used WLED as a test - it works fine).As a general procedure: get a 3v3 FTDI USB to serial controller, hook up RX, TX and GND but do not use the 3v3 "+" from the serial adapter to power the board (I had nothing but trouble). Instead, use a 5V power supply to power the board using a 5V pin - make sure the 5V ground goes to the board as well. Ground the IO0 (programming) pin, reset the board by briefly grounding the reset pin, wait a moment and remove GND from IO0. The board should now be ready to be programmed using ESP Web Tools or one of the IDEs that support ESP32 boards.
Trustpilot
1 week ago
2 weeks ago